Looking for a detailed walkthrough on setting up WordPress on localhost? Look no further.
Powering over 810 million websites globally, WordPress stands as the- leading Content Management System. Its user-friendly interface empowers users to craft and personalize websites without requiring coding skills.
But what if you seek a temporary WordPress site?
Optimizing site speed without a test platform poses challenges; experimenting with new themes or features on your live site risks performance disruptions. Hence, mastering the installation of Localhost WordPress becomes pivotal.
Operating WordPress on a local host offers a playground for testing new features, refining website aesthetics, conducting updates, and mastering website building. This approach ensures modifications without impacting user experience or risking functionality glitches.
Embark on this step-by-step tutorial to effortlessly install WordPress on localhost, set up WordPress files, and establish a local database to power your site.
In a hurry? Listen to the blog instead!
What Is Localhost?
Localhost functions akin to a web hosting platform used for WordPress website construction. In the typical website setup, you acquire a domain name and select a hosting service where all site data resides on the provider’s server.
Contrarily, on a localhost WordPress, your website’s data is housed within your PC’s local storage, enabling local operation without an online presence. This setup necessitates setting up- a personalized hosting environment by leveraging third-party software for WordPress.
For example, installing software such as XAMPP replicates a virtual hosting environment on your PC, allowing the installation of WordPress on localhost to initiate website development.
Why Should You Install WordPress On Localhost?
Launching WordPress on a local server offers a multitude of advantages for web designers and developers.
Primarily, it serves as an ideal starting point for beginners venturing into WordPress, enabling them to acquaint themselves with the CMS platform, construct complete websites from scratch, and explore the array of functionalities they can integrate into their sites.
Moreover, a locally installed WordPress facilitates the creation of a staging site—an identical copy of your live website—present within the localhost environment. This staging ground becomes invaluable for experts and developers, allowing seamless testing and experimentation with WordPress theme developer, plugins, and design alteration.
Additionally, employing Passion8Press software in localhost WordPress provides a secure avenue for updates and software testing. This environment enables thorough troubleshooting and issue identification without impacting the live website’s performance, ensuring peace of mind during necessary modifications.
Passion8Press, when integrated with localhost WordPress, serves as a robust tool for website development and management. It facilitates secure testing, updates, and troubleshooting within the local environment, ensuring smooth functionality before implementing changes to the live website. This integration streamlines the process, enhancing efficiency and security in WordPress website management.
What Are The Options To Install WordPress On Localhost?
Irrespective of your operating system, having localhost software for a WordPress localhost installation is crucial. The good news is that there are localhost software options available for every OS.
Currently, five prominent platforms offer the means to install WordPress and similar CMS locally. These are the leading localhost software choices for local CMS installation:
- XAMPP – An acronym for Cross-platform, Apache, MySQL, PHP, and Perl
- Local by Flywheel – A tool for local WordPress development
- WAMP – Windows, Apache, MySQL, PHP
- MAMP – My Apache – MySQL – PHP
- LAMP – Linux, Apache, MySQL, and PHP
Among these, XAMPP and Local by FreeWheel stand out for their versatility and support across various operating systems.
How To Install WordPress On Localhost In 6 Steps
The process of installing localhost WordPress is a fundamental step in website development, allowing individuals to create and test websites offline. This guide aims to simplify the often intimidating process, enabling users to leverage WordPress without an internet connection and replicating the need to hire WordPress developers.
Step 1: Downloading XAMPP Software
To begin, visit the official Apache Friends website and install WordPress on XAMPP tailored to your operating system. The download process will initiate automatically and typically takes a few minutes to complete.
Step 2: Installing And Running The XAMPP Server On Localhost
Once the download concludes, open the installer by clicking on the .exe file. Follow the step-by-step instructions provided, selecting the necessary components such as Apache, MySQL, PHP, and phpMyAdmin during the installation process.
Step 3: Running Modules To Test The Server
After the installation, access the XAMPP control panel and activate the Apache, MySQL, and PHP modules. Ensure that all module statuses appear as green; if any are displayed as red, utilize the ‘Start All’ or ‘Restart All’ options to rectify this.
Step 4: Downloading The Latest WordPress Version
Proceed by obtaining the latest version of WordPress from the official website. Unzip the downloaded files and transfer them to the htdocs folder located within- your XAMPP directory.
Step 5: Creating A Database
Access phpMyAdmin via the XAMPP control panel, where you’ll create a new database. Verify the setting, ensuring the appropriate configurations under the collation menu.
Step 6: Installing Localhost WordPress
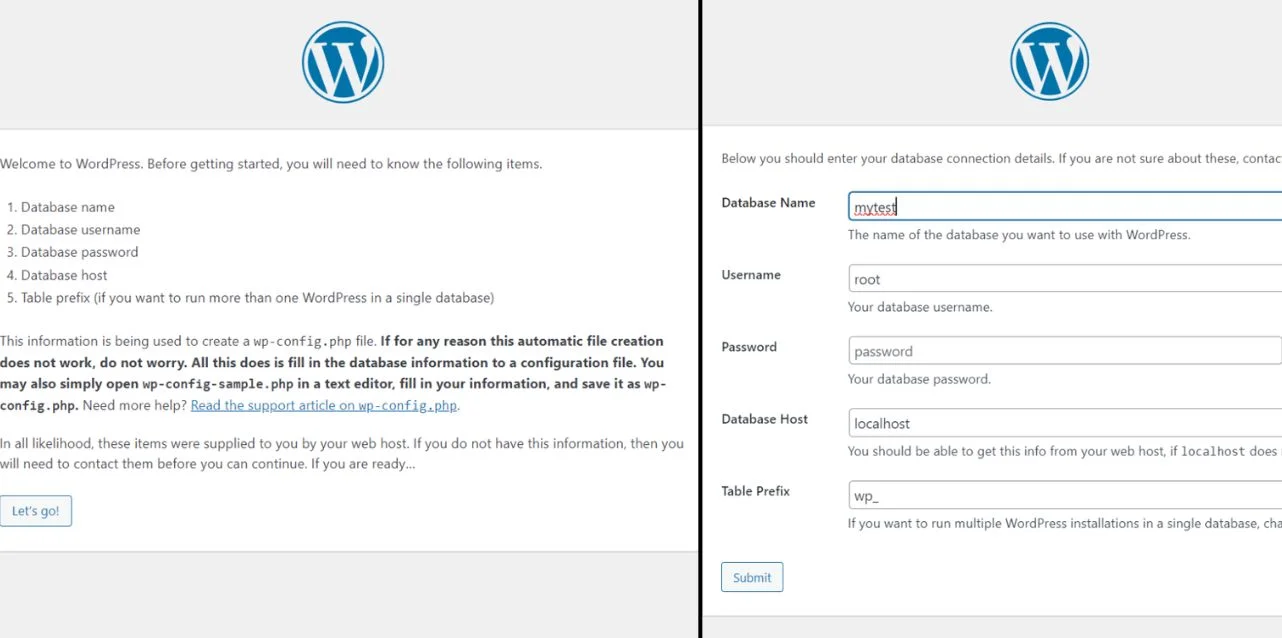
To finalize the installation, open your preferred web browser and enter http://localhost/testsite. Choose your desired language and input the necessary database credentials, including:-
- Database name ‒ the name of the database you created in phpMyAdmin.
- Username ‒ enter “root” as the default username.
- Password ‒ leave the MySQL database password field blank.
- Database host ‒ keep the default “localhost.”
- Table prefix ‒ keep the default “wp_.”
Once done, hit Submit -> Run the installation. Fill in the additional information needed, like the site name and login credentials, and click on the Install WordPress button.
Following these straightforward- steps results in a successful installation of localhost WordPress.
With this setup, users gain the ability to- explore and experiment with WordPress websites offline, offering a safe environment for outsourcing WordPress development and testing without affecting live websites. Mastering this process empowers individuals to harness the full potential of WordPress in a controlled, offline environment.
Read More
A Step-By-Step Guide To WordPress Plugin Development
A Beginner’s Guide For WordPress Theme Developer
How To Add Themes And Plugins On Localhost?
Once you’ve initiated WordPress on your local server, you gain the ability to seamlessly integrate any desired theme or plugin into your localhost environment.
There exist two methods- to install themes and plugins within your localhost WordPress setup.
Install Plugins
In the initial approach, navigate to http://localhost/yourwebsitename/wordpress/wp-admin- using the login credentials established during your local WordPress setup. On the WordPress dashboard, access Plugins > Add New, and explore or search for your preferred plugin.
The second method involves the direct installation- of a plugin via its zip file. Locate the XAMPP folder > htdocs > your website > WordPress > wp-content > plugins directory. Simply place the plugin’s zip file here, unzip it, and witness the installation of the plugin onto your local site.
For those seeking a dependable plugin, consider The Plus Addons for Elementor, a comprehensive toolkit comprising 120+ addons for Elementor. This versatile WordPress plugin development empowers your site with an array of functionalities, including custom designs, responsive content, WooCommerce integrations, and social media feeds.
Install Themes
Similarly, incorporating themes, like the Nexter theme, into your local WordPress environment is an effortless process.
Access http://localhost/yourwebsitename/wordpress/wp-admin and head to Appearance > Themes on your WordPress dashboard. Search for and select Nexter, an all-in-one theme for WordPress. Known for its rapid loading, minimal design, and lightweight code, Nexter offers an extensive library of design templates, a flexible header and footer builder, a dedicated WooCommerce module, global styles, and abundant customization options.
Alternatively, if you possess a custom theme’s zip file, navigate to the XAMPP folder > htdocs > your website > WordPress > wp-content > themes directory. Unzip your custom theme file here, enabling its installation on your local website.
Also, you can utilize Passion8Press as it helps in creating versatile plugins and themes that can smoothly integrate with your website.
Conclusion
Installing WordPress on localhost in a- step-by-step manner unlocks a world of possibilities for website development and experimentation. By following these straightforward steps, you’ve established a powerful foundation for creating and customizing websites offline.
Embracing localhost development offers unparalleled advantages. It provides a secure and controlled environment for testing themes, plugins, and configurations without impacting a live site. This process fosters confidence in making changes, exploring new designs, or experimenting with diverse functionalities without the risk of affecting your online presence.
Remember, localhost WordPress installation isn’t just a technical exercise; it’s a gateway to creativity and innovation. It empowers you to refine your web development skills, learn new techniques, and troubleshoot effectively in a safe environment.
As you venture forth, continue exploring the vast landscape of WordPress’s potential. Dive into customization, experiment with various plugins, explore different themes, and unleash your creativity without constraints. The more you engage with localhost WordPress, the more confident and adept you’ll become in crafting exceptional online experiences.
So, take this knowledge, experiment fearlessly, and enjoy the journey of transforming your localhost into a canvas where your web development dreams take shape. Cheers to your exciting WordPress localhost adventures!


